Programming Laboratory
Programming in Java - JUnit
Summary of 1st classes
What do we know after the first class:
* The project is divided into source catalogs - src, test files - test, resources - resources.* In the project directory there is a file pom.xml corresponding to the Maven settings, in this file we add links to external libraries and settings for building the application.* The logger settings can be found in the file log4.properties in the resources directory. In the logger definition, we give the class in which it is defined - it will be its name, thanks to which it is easier to determine where the given entry comes from in the future.* We work on GIT - new functionality (class topic) is assumed to be on a new branch.
Synchronization of the Git code with the original repository
Go to VCS -> Git -> Remotes
Add entry for the host repository
give it some name.
Choose Ctrl + T to refresh dependencies.
If it does not work in order to download the changes select VCS -> Git -> fetch.
Then, on the branch list in the bottom right corner of the screen, you should see the branches from Teacher and your repository.
Go to branch TestAndDebugStart
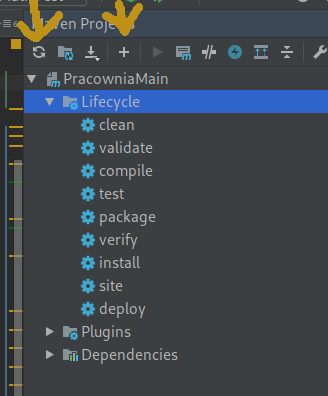
Since we are moving into new repository it is possible that you need to set up maven again. Go to Maven Tab and check if you see the goals (Lifecycle, Plugin, Dependencies) if not try to refresh Maven. If this does not help choose the little plus and choose pom.xml from your local hard drive. Afterward click refresh in Maven again. That should help - check if your .java files have green circle next to them in the Project view tab.
Useful IDE shortcuts in IdeaJ
List of IdeaJ shortcuts:
Alt + Enter (or a ligthbulb) show a hint for the IDE error solution
Ctrl + W, :hold:` Ctrl + Shift + W` select the entire section, extend the selection, narrow the selection.
Ctrl + Shift + N search for a file by name
Shift + Shift search everywhere
Alt + Insert generate code
Ctrl + / comment on the line
Ctrl + Shift + / uncomment lines
Ctrl + E files last opened
Ctrl + Alt + L format the code with default formatting settings
Tab, :hold:` Shift + Tab` indent, undo indent
Shift + F6 change the name
Ctrl + Shift + Alt + T refactor
Ctrl + Alt + M Extract the method
Alt + Right / Left toggle the tabs
Ctrl + (click on method name) show usage
Ctrl + Alt + (click on method name) show the implementation
Ctrl + K is used to commit the code locally to the repository
Ctrl + Shift + K is used to commit code to an external repository
Ctrl + T is used to refresh the project - download changes from the server
Task
Move (if you are not there yet) to branch TestAndDebugStart.
Search for a class named ClassThatHaveItAll (Ctrl + Shift + N).
Format the code (Ctrl + Alt + L).
Add to the class a parameter
List<Long> list;Choose an automatic error correction (Alt + Enter).
Then select (Alt + Insert) to generate the constructor, and setters and getters for the class.
Find the interface called InterfaceOne (Ctr + Shift + f). Search for the use and implementations of the method printMe() (Ctrl + click on the method name) by clicking on either the definition or the usage of the method.
Debug
You can run code execution in Debug mode by choosing Run -> Debug or by choosing the right mouse button on the class and then Debug.
You can also click on the green triangle next to the class name to Run or Debug the Class

What is debugging?
Helpful in debugging are the so-called breakpoints, places in which we want the execution to stop in execution so that we can check variables values. To add a breakpoint, click next to the line number so that a red dot appears.
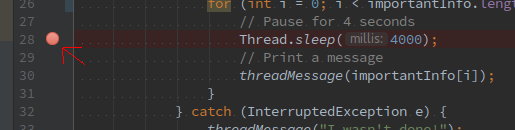
After clicking right mouse button on the dot, we can also specify a special condition on which the breakpoint should work.

After launching the debug mode, the debug window appears on the bottom of the screen. You can find there the current values of the variables. Additionally, we can choose by Alt + F8 or by clicking on the calculator icon a window for evaluation of expressions. Expression can be useful in debugging large structures like lists which are hard to go through one-by-one.

With the appropriate settings, it is also possible to debug applications running on the server at runtime (more on this subject in future classes).
Task
Run the Breakpoints class. What error has occurred ?
Debug the execution of the class Breakpoints.
To stop the call, add a breakpoint in the class.
Use F8 (or the down arrow on the debug panel) to move the code execution line by line.
Use StepInto - F7 (right-down arrow on the debug panel) to enter the method call.
Find and correct the error.
Task
Start the class EvaluateExpressions. What error has occurred?
Set the breakpoint in the ProcessElementAtIndex method.
Open the evaluation window and enter in it a line list.get(index).
Choose F9 (green triangle on the debug panel) to movo onto the next breakpoint execution and preview the variable values.
To check how the list look like enter in evaluation window
Collections.reverse(list);
list
Find and correct the error.
Task
Run the class ConditionalBreak. What error has occurred?
On line 19, set the normal breakpoint is it easy to find the error?
Set the conditional breakpoint to stop when !EverythingIsOk.
As you might notice breakpoint is not working, move it to the line 19.
Run the code, what caused the error?
JUnit
JUnit is a library for writing code tests in Java. The tests are aimed at controlling the quality of the code, check various call paths, as well as maintain error-free state of the code.
The Maven build process by default runs all tests in the process of creating an executable file.
First, we need to add in the pom.xml file the dependence for the test module.
In our branch, a test class is already created, but to add a new one, the following operations should be performed:
Enter the class AdvanceMath and select Ctrl + Shift + T, click create to create new Test. To achieve the same thing differently you can choose the class name and click Alt + Enter and select create test.
The JUnit library uses the so-called annotations. Before each method that is designed to be run as a test, we put @Test.
Another important annotation is @Before which allows us to define the operations that will be performed before running each test.
Sample testing class:
package second.junit;

import com.sun.xml.internal.ws.policy.AssertionSet;
import example.HelloWorld;
import org.apache.log4j.Logger;
import org.junit.Assert;
import org.junit.Before;
import org.junit.Test;

import static org.junit.Assert.*;

public class AdvanceMathTest {

    AdvanceMath math;
    final static Logger logger = Logger.getLogger(AdvanceMath.class);

    @Before
    public void setUp(){
        logger.info("Odpalam setUpa");
        math = new AdvanceMath();
    }

    @Test
    public void additionTest() {
        Integer a = math.addition(1,4);
        assertTrue(a==5);
    }

    @Test
    public void additionTestString() {
        long a = math.addition("1",4);
        Assert.assertEquals(5L, a);
    }


    @Test(expected = Exception.class)
    public void additionTestString2() {
        int a = math.addition("a1",4);
    }

}
You can run the test by clicking on the class and choosing run or by the Maven tab -> Test. Tests are also executed automatically when you perform Install in Maven.
Examples of using the JUnit library:
It is recommend you to look at examples on how to test lists and maps.
Project covering topics 1-3
Creating a program for inserting the list of residents and saving them to a file.
The user put in console the name of the city and in the next line the name, surname and the PESEL number of a person. The PESEL number should be checked for correctness - at least in terms of the checksum of the last digit.
In the case of a wrong PESEL number, the given entry is not saved to the file and the user receives an error message.
Each time program is executed it creates a new response file (the program does not read any data!).
If you enter the same PESEL number twice with different name and surname, the old entry is overwritten with new one.
every 30 seconds counting from full minutes, the entered answers are automatically saved to the file results.txt. The responses in the file are to be sorted in relation to cities (i.e. city A - list of citizens (residents of a given city do not have to be sorted), city B - list of citizens etc.).
Warning! The user may enter the answers in any order in the program.
every full minute program should show on the screen the message "X minutes to the end of classes / break". Model classes and breaks according to the WMI UAM schedule.
Write tests for given classes - at least for the method that verifies the correctness of the PESEL number and the method that check if the given time is within a break or classes time.
I suggest creating the code on the repository in branch master.
- *
Material sources:
Good practices of code development
Make indents inside loops and if-statements
function foo() {
    if ($maybe) {
        do_it_now();
        again();
    } else {
        abort_mission();
    }
    finalize();
}
You can deal with curly brackets also like this:
function foo()
{
    if ($maybe)
    {
        do_it_now();
        again();
    }
    else
    {
        abort_mission();
    }
    finalize();
}
Use blank lines consistently and as required. Blank lines may be used for separating code lines or line groups semantically for readability.
Character count of a line should be limited for readability.
Name variables, procedures, functions in sensible way, start with small letter and introduce new word with capital letter
studentsCounter;
listIterator;
averageOverLastWeek;
findBestInClass();
computeAverage();
Name classes in sensible way, start with capital letter and introduce new word with capital letter
NightShift;
FastCar;
Name constant values with all capital letters, separate words with _
DAYS_IN_THE_WEEK();
NUMBER_OF_SHIFTS();
Using space chars in code should also be consistent in whole application. Generally, situations below are suitable for using spaces:
Between operators and operands:
a += b , c = 0; (a == b)Between statement keywords and brackets:
if (value) {, public class A {After ';' char in loops:
for (int i = 0; i < length; i++)Between type casters and operands:
(int) value , (String) value